Software
Introduction
The Sailor Hat for Raspberry Pi requires additional software on the Raspberry Pi Operating System to fully utilize the device functionality. An installation script is provided to automatically install all required software on a fresh Raspberry Pi OS installation. Use of the installation script is described in the Getting Started Section. You will only need to follow the manual installation instructions if you prefer not to have automated scripts modify your system configuration or if you have to troubleshoot your installation.
For manual installation, download the code at github.com/hatlabs/SH-RPi-daemon. The required software and configuration changes, as well as the firmware software details, are described below.
Enabling I2C and SPI
The I2C and SPI interfaces need to be enabled. This can be done either by running raspi-config or by editing /boot/firmware/config.txt directly.
If you use raspi-config, skip until the end of this subsection.
sudo nano /boot/firmware/config.txt
Find the following line:
#dtparam=i2c_arm=on
and edit it by removing the comment marker at the beginning:
dtparam=i2c_arm=on
Enabling the new interfaces
Again, edit /boot/firmware/config.txt:
sudo nano /boot/firmware/config.txt
Scroll down to the [all] section.
You need to add three new lines there. First, enable the RTC (if your device has one):
dtoverlay=i2c-rtc,pcf8563
Then, configure the kernel to signal the Sailor Hat on power off:
dtoverlay=gpio-poweroff,gpiopin=2,input,active_low=17
Again, write the file by pressing Ctrl-O and exit Nano by pressing Ctrl-X.
Raspberry Pi daemon
To make the Raspberry Pi OS aware of the power state, a daemon (service software) needs to be installed.
If you have cloned the SH-RPi-daemon repository, you can install the daemon by issuing the following commands:
sudo apt install -y python3-pip
sudo pip3 install .
Next, you will have to install the service definition file and enable the service:
sudo install -o root shrpid.service /lib/systemd/system
sudo systemctl daemon-reload
sudo systemctl enable shrpid
That’s it! After a reboot, the daemon will start automatically.
Note: The Automated installation script described in the Getting Started Section will perform all software installation steps described above automatically.
Daemon Configuration File
You can configure the daemon settings by creating and editing the configuration file /etc/shrpid.conf.
The file uses YAML formatting.
The following options are available:
# I2C bus number. You should never need to change this.
i2c-bus: 1
# I2C address of the SH-RPi. Only change this if you have custom firmware.
i2c-addr: 0x6d
# Maximum allowed blackout duration before shutdown.
blackout-time-limit: 3.0
# Input voltage limit for blackout detection.
blackout-voltage-limit: 9.0
# Socket file for the REST API. You should never need to change this.
socket: /var/run/shrpid.sock
# Group for the socket file. You should never need to change this.
socket-group: adm
# Command used to initiate a shutdown. Replace this with a custom script
# to customize the shutdown behavior.
poweroff: /sbin/poweroff
You can create a new configuration file by running nano /etc/shrpid.conf and pasting the above content into the file.
Comment out any lines you don’t want to change.
Save the file by pressing Ctrl-O and exit Nano by pressing Ctrl-X.
Command-line Interface
The command-line interface is a Python script that can be used to control the Sailor Hat for Raspberry Pi from the Raspberry Pi command line. It is installed by the installation script described in the Getting Started Section.
The script, shrpi, can be run with the --help option to get instructions on the different commands. Some main use-cases are described below.
shrpi print
Print the current status and configuration of the Sailor Hat for Raspberry Pi.
shrpi set <option> <value>
Set different configuration values. For example,
shrpi set led 50
will set the LED brightness to 50%.
shrpi sleep 3600
Shut down the Raspberry Pi and turn it back on after 3600 seconds (1 hour).
shrpi sleep 15:00
Shut down the Raspberry Pi and turn it back on at 15:00 (3pm).
shrpi sleep 15:00:00
REST API
shrpid implements a REST API that can be used to query the current status and configuration of the Sailor Hat for Raspberry Pi and to set configuration values.
The API is available on a file socket at /var/run/shrpid.sock. An example query with curl is shown below:
curl --unix-socket /var/run/shrpid.sock http://localhost/state
For further details on available commands, see the SH-RPi-daemon source code.
Firmware
The program code running on the onboard ATtiny1616 microcontroller is called the SH-RPi firmware.
The firmware repository is at https://github.com/hatlabs/SH-RPi-firmware.
The following subsections describe how to update the firmware to get new features or if you want to hack it yourself.
Updating the firmware
It is possible to update the SH-RPi firmware using the Raspberry Pi itself. This requires some jumpers and a bit of software configuration.
Flashing is performed over ATtiny’s UPDI interface using avrdude.
Hardware Configuration
Place jumpers on all pins on the PROG header as shown in red in the figure below. This will connect the microcontroller programmer circuitry and the debugging serial interface to the Raspberry Pi. In addition, the 5V output of the buck controller is forced on, so that the Raspberry Pi won’t turn itself off when starting the flashing process.
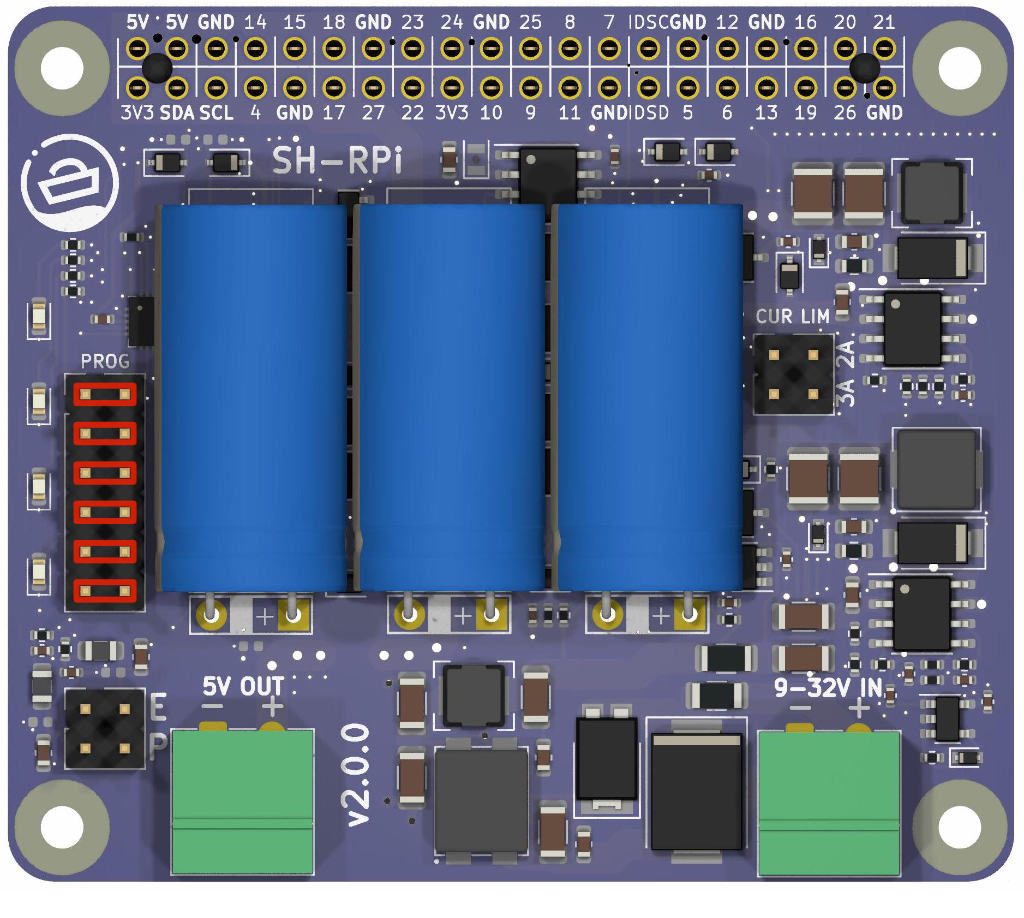
Set the red jumpers to enable self-flashing.
Note! For proper operation afterwards, it is essential that you remove at least the third jumper from the PROG header. Otherwise, the Raspberry Pi will not be able to turn itself off.
Raspberry Pi configuration changes
The next step is to enable the serial UARTs on the Raspberry Pi. They are used for both the UPDI and serial debugging interfaces. On Bluetooth-enabled Pis, the UART is normally reserved by the onboard Bluetooth circuitry. So, let’s disable Bluetooth.
Add the following lines at the end of /boot/firmware/config.txt:
dtoverlay=disable-bt
dtoverlay=uart5
The first one disables the Bluetooth modem. The second one enables the UART5 interface on the GPIOs 12 and 13 on pins 32 and 33. This is the serial interface used by the SH-RPi firmware for debugging.
We also need to disable the system service initializing the Bluetooth modem:
sudo systemctl disable hciuart
Finally, prevent the system serial console from attaching to the serial port. Remove the console=serial0,115200 part from the beginning of /boot/cmdline.txt.
Reboot to allow the changes to take place.
Installing Flashing Software
Thanks to the PlatformIO framework, all necessary tools can be downloaded and installed automatically. We just need to get
the firmware source code first. Let’s install the git version control system and clone the firmware repository:
sudo apt update
sudo apt -y install git
git clone git@github.com:hatlabs/SH-RPi-firmware.git
Now, we can install the PlatformIO framework:
sudo pip3 install -U platformio
Edit the platformio.ini file and change the upload_port to /dev/ttyAMA0:
[env]
...
upload_port = /dev/ttyAMA0
monitor_port = /dev/ttyAMA1
Flashing
Finally, we can build and upload the firmware. The first time you run this command, it will download and install the necessary tools. This may take a while.
cd SH-RPi-firmware
pio run -t upload
The white status LEDs will turn off during the flashing. After a few seconds, they will turn on again and the flashing is complete. At this point, remove the jumpers from the PROG header.
Restoring Bluetooth
If you want to keep using Bluetooth, remember to undo the steps you made previously. To do this, you’ll need to reverse the changes you made to /boot/firmware/config.txt, /boot/cmdline.txt, and re-enable the hciuart service:
- Remove the following lines from
/boot/firmware/config.txt:
dtoverlay=disable-bt
dtoverlay=uart5
Add
console=serial0,115200back to the beginning of/boot/cmdline.txt.Re-enable the
hciuartservice by running:
sudo systemctl enable hciuart
- Reboot your Raspberry Pi for the changes to take effect.
That’s it! You have successfully updated the firmware on your Sailor Hat for Raspberry Pi and restored Bluetooth functionality if desired.